Windows Desktop workflow
This page presents a use case for using Codemagic to export a Godot project for Windows Desktop. We will not cover the syntax, structure, or functionality of a codemagic.yaml file.
- You can skip the tutorial and grab the yaml files in Overview
- To learn how
codemagic.yamlfiles work, see Creating codemagic.yaml. - To better understand what we'll do here, take a look at Workflow Configuration if its not already done.
- To learn how to configure your Godot project and repository, see Process Overview.

Image by Codemagic, used under CC BY-ND 4.0 license. See gallery
Requirements
- A text editor
- Workflow Configuration file. (See Workflow Configuration
As explained in Project Configuration, you should configure your project for export as if you were exporting it on your local machine.
- Learn more about how to export a Godot project to Windows with Exporting for Windows.
Minimal configuration
We need to create a new workflow in which we will define its own specific variables. Add the following code to your codemagic.yaml file, right after the definitions section:
workflows:
  godot-windows-desktop-workflow:
    name: Windows Desktop Export
    max_build_duration: 120
    instance_type: mac_mini_m2
    working_directory: /Users/builder/Downloads

    environment:
      vars:
        <<: *godot_variables
        OUTPUT_FILE: test.exe
        EXPORT_PRESET: Windows Desktop
        RCEDIT_URL: https://github.com/electron/rcedit/releases/download/v2.0.0/rcedit-x64.exe
Make sure your file now looks like this:
definitions: ...

workflows:
  godot-windows-desktop-workflow: ...
Do you remember the Workflow Configuration file ?
We use the << and * operators to reuses its sections.
- Learn more about reusable sections in a
codemagic.yamlfile with Reusing sections - For more details on the reused variables, see Minimal Configuration
Here a description of variables we defined:
| Variable | Description |
|---|---|
| OUTPUT_FILE | The name of the exported file. Format: <PROJECT_NAME>.<EXTENSION>. The output file extension should match the one used by the Godot export process. See Exporting from the command line |
| EXPORT_PRESET | The name of the export preset that will be used to export your project. |
| RCEDIT_URL | rcedit download url |
- To learn more about environment variables in a
codemagic.yamlfile see Configuring Environment Variables
Now we need to complete our configuration file. Add the following code to your godot-windows-desktop-workflow section:
scripts:
  - *install_godot
  - *install_godot_export_templates
  - *export_project
  - *gather_files

artifacts:
  - *zipped_export
Then, make sure your workflow now looks like this:
workflows:
  godot-windows-desktop-workflow:
    ...
    environment: ...
    scripts: ...
    artifacts: ...
Nice !, all that's left is to launch a new build to export your project. To do this, you can use Codemagic's interface, or events affecting your repository such as push.
- See Build Automatically to automate the execution of your Codemagic configuration.
- See also Build Notifications to get a notification informing you of the result of your build.
You can now Download the configuration file to export your Windows Desktop project with a Codemagic build machine.
Additional configuration
The following configurations (rcedit and Windows code signing) both require a modification of the Godot editor settings file. Therefore, we'll configure a basic script for both of these configurations. This script must run before the export script (*export_project). Otherwise, it won't be able to influence the export process. Add the following code to the scripts section of godot-windows-desktop-workflow:
- name: Export Configuration
  script: |
    export SETTINGS_VERSION=$(echo "$GODOT_VERSION" | awk -F'[.-]' '{
        if ($1 == 3) print "3";
        else if ($2 == 0) print $1;
        else print $1"."$2
    }')
    export GODOT_SETTINGS=${EDITOR_DATA_DIR}/editor_settings-${SETTINGS_VERSION}.tres
    cat <<EOF > "$GODOT_SETTINGS"
    [gd_resource type="EditorSettings"]

    [resource]
    EOF
Make sure your scripts section now looks like this:
scripts:
  ...
  - *install_godot_export_templates ...
  - name: Export Configuration ...
  - *export_project ...
This script generates the Godot editor settings file.
To do this, it extracts the version of the file used by Godot (4.<MINOR_VERSION>.tres for Godot 4 or 3.tres for Godot 3). The settings file version is extracted from the GODOT_VERSION variable, using a word processing tool like awk.
Second, the script stores the settings file in the location where Godot expects to find it.
- Learn more about word processing with
awkwith awk Command in Unix/Linux with Examples
rcedit configuration
rcedit is not required for exporting to Windows with Godot. rcedit is a program that allows you to edit an exe file's resources, such as the icon and metadata.
- See Changing the Application Icon for Windows to learn more about using rcedit in Godot.
Before continuing, make sure you have the Additional Configuration in your configuration file. Also make sure you have enabled the Modify Resources option in the export preset.

To install rcedit, we'll add a few lines to our Export Setup script. Right at the beginning of the script, add the following lines:
softwareupdate --install-rosetta --agree-to-license
brew install --cask wine-stable
curl -L "$URL_RCEDIT" -o "rcedit-x64.exe"
chmod +x rcedit-x64.exe
export RCEDIT_PATH=$(pwd)/rcedit-x64.exe
export WINE_PATH=$(which wine)
Then make sure your script now looks like this:
softwareupdate --install-rosetta --agree-to-license ...
export SETTINGS_VERSION=$(echo "$GODOT_VERSION" | awk -F'[.-]' '{ ...
What do the new lines do?
Since we're using a Mac and rcedit is a Windows executable, we download it (curl -L "$URL_RCEDIT" -o "rcedit-x64.exe") and run it with Wine (installed via brew install --cask wine-stable). We then ensure that rcedit is executable on this build machine via chmod +x rcedit-x64.exe.
As wine-stable is built for Intel macOS, it requires Rosetta 2. So we install Rosetta on the build machine via softwareupdate --install-rosetta --agree-to-license.
We then define the RCEDIT_PATH and WINE_PATH environment variables. These variables will be used to enable Godot to locate and use rcedit.
To enable Godot to use RCEDIT_PATH and WINE_PATH, we need to complete Godot's editor parameter file. Add the following lines below the [resource] part of the script:
export/windows/rcedit = "$RCEDIT_PATH"
export/windows/wine = "$WINE_PATH"
Then, make sure your [resource] section now looks like this:
[resource]
export/windows/rcedit = "$RCEDIT_PATH"
export/windows/wine = "$WINE_PATH"
EOF
These two lines are equivalent to the options in Godot's editor interface. They specify the path to rcedit and wine on the build machine.
Nice !, all that's left is to launch a new build to export your project. To do this, you can use Codemagic's interface, or events affecting your repository such as push.
- See Build Automatically to automate the execution of your Codemagic configuration.
- See also Build Notifications to get a notification informing you of the result of your build.
You can now Download the configuration file to export your Windows project with rcedit configured on a Codemagic build machine.
Notice
Please don't worry if you see Wine error messages during the export process. These errors are common when running Windows tools in a headless environment and only indicate missing graphical components, which are unnecessary for CLI operations. They do not affect the functionality or outcome of the process.
Click to see errors message samples
rcedit (/Users/builder/Downloads/builds/windows/test.tmp): wine: created the configuration directory '/Users/builder/.wine' 002c:fixme:actctx:parse_depend_manifests Could not find dependent assembly L"Microsoft.Windows.Common-Controls" (6.0.0.0) 004c:fixme:actctx:parse_depend_manifests Could not find dependent assembly L"Microsoft.Windows.Common-Controls" (6.0.0.0) 0054:fixme:actctx:parse_depend_manifests Could not find dependent assembly L"Microsoft.Windows.Common-Controls" (6.0.0.0) 004c:err:winediag:nodrv_CreateWindow Application tried to create a window, but no driver could be loaded. 004c:err:winediag:nodrv_CreateWindow L"The explorer process failed to start." 004c:err:systray:initialize_systray Could not create tray window 004c:err:ole:StdMarshalImpl_MarshalInterface Failed to create ifstub, hr 0x80004002 004c:err:ole:CoMarshalInterface Failed to marshal the interface {6d5140c1-7436-11ce-8034-00aa006009fa}, hr 0x80004002 004c:err:ole:apartment_get_local_server_stream Failed: 0x80004002 002c:err:winediag:nodrv_CreateWindow Application tried to create a window, but no driver could be loaded. 002c:err:winediag:nodrv_CreateWindow L"The graphics driver is missing. Check your build!" 0054:err:winediag:nodrv_CreateWindow Application tried to create a window, but no driver could be loaded. 0054:err:winediag:nodrv_CreateWindow L"The graphics driver is missing. Check your build!" 0054:err:ole:apartment_createwindowifneeded CreateWindow failed with error 1400 0054:err:ole:apartment_createwindowifneeded CreateWindow failed with error 1400 0054:err:ole:apartment_createwindowifneeded CreateWindow failed with error 1400 0054:err:ole:StdMarshalImpl_MarshalInterface Failed to create ifstub, hr 0x80070578 0054:err:ole:CoMarshalInterface Failed to marshal the interface {6d5140c1-7436-11ce-8034-00aa006009fa}, hr 0x80070578 0054:err:ole:apartment_get_local_server_stream Failed: 0x80070578 0054:err:ole:start_rpcss Failed to open RpcSs service 0044:err:winediag:nodrv_CreateWindow Application tried to create a window, but no driver could be loaded. 0044:err:winediag:nodrv_CreateWindow L"The graphics driver is missing. Check your build!" 0094:err:winediag:nodrv_CreateWindow Application tried to create a window, but no driver could be loaded. 0094:err:winediag:nodrv_CreateWindow L"The graphics driver is missing. Check your build!" 0094:err:setupapi:SetupDefaultQueueCallbackW copy error 1812 L"@C:\windows\system32\drivers\wineusb.sys,-1" -> L"C:\windows\inf\wineusb.inf" 0094:fixme:file:NtLockFile I/O completion on lock not implemented yet 0094:fixme:ntdll:NtQuerySystemInformation info_class SYSTEM_PERFORMANCE_INFORMATION 009c:err:environ:init_peb starting L"Z:\Applications\Wine Stable.app\Contents\Resources\wine\share\wine\mono\wine-mono-9.4.0\support\removeuserinstalls-x86.exe" in experimental wow64 mode 00a4:err:environ:init_peb starting L"Z:\Applications\Wine Stable.app\Contents\Resources\wine\share\wine\mono\wine-mono-9.4.0\support\installinf-x86.exe" in experimental wow64 mode 0094:fixme:msi:internal_ui_handler internal UI not implemented for message 0x0b000000 (UI level = 1) 0094:fixme:msi:internal_ui_handler internal UI not implemented for message 0x0b000000 (UI level = 1) 00fc:err:environ:init_peb starting L"C:\windows\syswow64\rundll32.exe" in experimental wow64 mode 00fc:fixme:msg:pack_message msg 14 (WM_ERASEBKGND) not supported yet 00fc:err:winediag:nodrv_CreateWindow Application tried to create a window, but no driver could be loaded. 00fc:err:winediag:nodrv_CreateWindow L"The graphics driver is missing. Check your build!" 0104:err:environ:init_peb starting L"C:\windows\syswow64\iexplore.exe" in experimental wow64 mode 002c:err:setupapi:do_file_copyW Unsupported style(s) 0x10 0118:err:ntoskrnl:ZwLoadDriver failed to create driver L"\Registry\Machine\System\CurrentControlSet\Services\winebth": c00000e5 002c:err:setupapi:SetupDiInstallDevice Failed to start service L"winebth" for device L"ROOT\WINE\WINEBTH", error 1359. 002c:err:setupapi:SetupDiInstallDevice Failed to control service L"winebth" for device L"ROOT\WINE\WINEBTH", error 1062. 002c:err:setupapi:do_file_copyW Unsupported style(s) 0x10 0140:err:setupapi:do_file_copyW Unsupported style(s) 0x10 0140:err:setupapi:do_file_copyW Unsupported style(s) 0x10 014c:err:hid:handle_DeviceMatchingCallback Ignoring HID device 0x7fa19780a150 (vid 05ac, pid 8106): not a joystick or gamepad 014c:err:hid:handle_DeviceMatchingCallback Ignoring HID device 0x7fa197809410 (vid 05ac, pid 8105): not a joystick or gamepad 0024:fixme:kernelbase:AppPolicyGetProcessTerminationMethod FFFFFFFFFFFFFFFA, 000000000011FE80
Code signing
Before continuing, make sure you have Additional configuration in your configuration file. Also make sure you've enabled the Code signing option in the export preset. 
To sign your project, we need to set up a Code Signing tool. We'll be using a Mac for this tutorial. To sign a Windows application with Godot on a non-Windows operating system, we need to use osslsigncode. If you're using Codemagic's Windows compiler, use SignTool instead.
- To learn how to create a certificate for your Windows application, see Create a package signing certificate
- Learn more about signing code for Windows in Godot with Windows Application Signing
Add the following line at the top of your Export Configuration section:
brew install osslsigncode
export SIGN_TOOL_PATH=$(which osslsigncode)
Then make sure your section now looks like this:
brew install osslsigncode
export SIGN_TOOL_PATH=$(which osslsigncode)
export SETTINGS_VERSION=$(echo "$GODOT_VERSION" | awk -F'[.-]' '{ ...
The 2 new lines install osslsigncode on the build machine and store the path to osslsigncode in a variable named SIGN_TOOL_PATH. To complete osslsigncode installation, we now need to add the osslsigncode path to the Godot Editor settings file. To do so, add the following line below the [resource] part of the script:
export/windows/signtool = "$SIGN_TOOL_PATH"Then, make sure your [resource] section now looks like this:
[resource]
export/windows/signtool = "$SIGN_TOOL_PATH"
EOF
Nice !, all that's left is to setup your code signing cerfiticate on the build machine.
We will use the following variables to retrieve your signing certificate and sign your Godot project. These variables will be used by Godot to sign your application.
- Learn more about some of these variables in [Godot 4 Windows environment variable](https://docs.godotengine.org/en/stable/tutorials/export/exporting_for_windows.html#environment-variables
| Variable name | Variable value | Group |
|---|---|---|
| CERTIFICATE_FILE_NAME | The name of your certificate with the extension.(e.g. cert.pfx) | windows_credentials |
| GODOT_WINDOWS_CODESIGN_IDENTITY | Your certificate - base64 encoded | windows_credentials |
| GODOT_WINDOWS_CODESIGN_IDENTITY_TYPE | Type of identity to use(0, 1 or 2). | windows_credentials |
| GODOT_WINDOWS_CODESIGN_PASSWORD | Contain your certificate password | windows_credentials |
For GODOT_WINDOWS_CODESIGN_IDENTITY_TYPE, 0, 1 and 2 refers to Select automatically, Use PKC12 file (specify *.PFX/*.P12 file) and Use certificate store (specify SHA-1 hash) respectively. 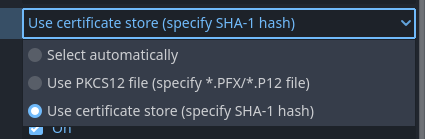
Add these variables in the Codemagic interface (either as Application or as Team variables), make sure to click Secure to make sensitive data encrypted.
- Learn how to store these variables using the Codemagic interface by watching this video:
- To learn more about environment variables in a
codemagic.yamlfile see Configuring Environment Variables - To learn more about storing binary files with Codemagic, see Storing Binary files
- If you don't own a PC, you can use a website like base64.guru or base64encode to encode your
keystorefile to base64.
To use the defined variables in our workflow, we have to add their group(windows_credentials) to our configuration file(codemagic.yaml file). To do so, add the following code to the environment section of godot-windows-desktop-workflow:
groups:
  - windows_credentials
Then make sure your workflow now looks like this:
godot-windows-desktop-workflow:
  ...
  environment:
    groups:
      - windows_credentials
    ...
TIP
If you already have a groups section in your script, simply add the - windows_credentials line to it.
We now need to configure our variables so that Godot can find and use them. In the Export configuration section, add the following lines:
export CERTIFICATE_PATH=/tmp/$GODOT_WINDOWS_CODESIGN_FILE_NAME
echo $GODOT_WINDOWS_CODESIGN_IDENTITY | base64 --decode > $CERTIFICATE_PATH
echo "GODOT_WINDOWS_CODESIGN_IDENTITY=$CERTIFICATE_PATH" >> $CM_ENV
Then, make sure your scripts section now looks like this:
scripts:
  ...
  - *install_godot_export_templates ...
  - name: Export Configuration
    ...
    EOF
    export CERTIFICATE_PATH=/tmp/$GODOT_WINDOWS_CODESIGN_FILE_NAME
    ...
  - *export_project ...
What have we done?
- First, we define a variable (
CERTIFICATE_PATH) to specify the path where your certificate will be stored on the build machine. Then, we decode your base64-encoded file and save it to that location. - Next, we update the variable holding the encoded file to point to the decoded file's path, since Godot expects a file path rather than raw encoded data.
- Finally, we register the variable now holding the certificate path as global environment variables on the build machine, so Godot can access and use it during the build.
Nice !, all that's left is to launch a new build to export your project. To do this, you can use Codemagic's interface, or events affecting your repository such as push.
- See Build Automatically to automate the execution of your Codemagic configuration.
- See also Build Notifications to get a notification informing you of the result of your build.
You can now Download the configuration file to export a signed Godot Windows project with a Codemagic build machine.
Overview
Summary of what we've covered on this page using a Codemagic build machine:
- Exported a Godot project to Windows
- Exported a Godot project to Windows using resource editing with rcedit
- Exported a Godot project to a signed Windows application.
Download Table
| File | Content | Tutorials |
|---|---|---|
| Download | Unsigned Godot Windows Export Configuration | Jump to tutorial |
| Download | rcedit Configuration for Godot Windows Export | Jump to tutorial |
| Download | Code Signing Configuration for Godot Windows Export | Jump to tutorial |
Caution !!!
To use these scripts effectively, please refer to the corresponding tutorials.
The scripts on this site are general and will suit most use cases. However, specific adjustments to your project may be necessary.
Please note that some scripts depend on environment variables which must be set via the Codemagic interface. Without them, some scripts will not work.
Optional resources to help refine your configuration:
Getting help and support
If you have a technical question or need help with some particular issue, you can get help in the GitHub Discussions community.